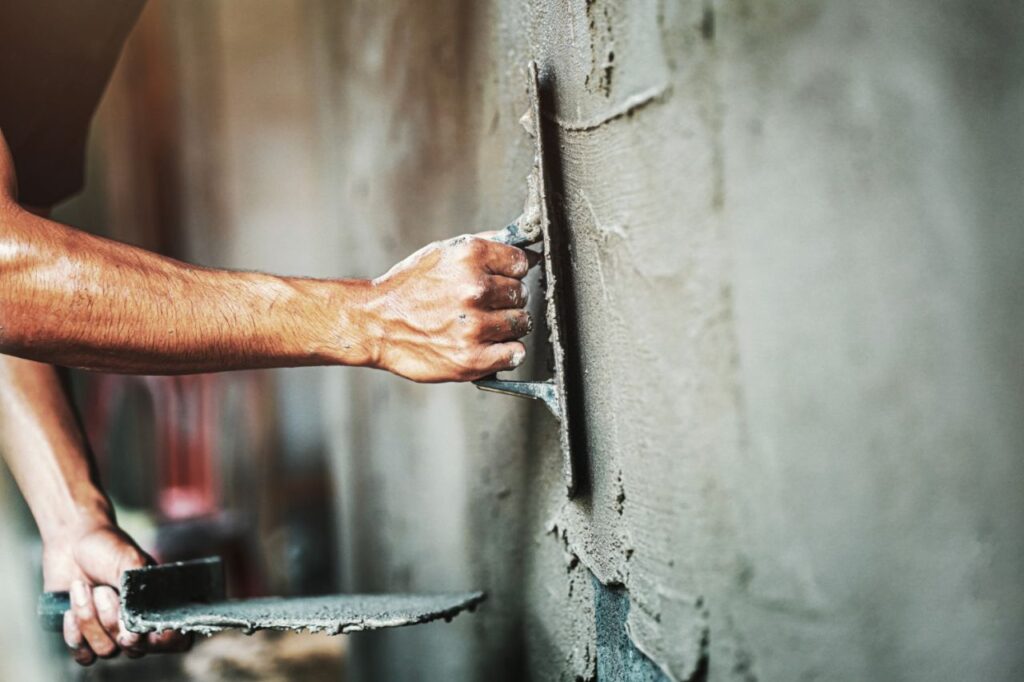
Plastering is the process of applying a thin layer of plaster to a wall or ceiling. This is done as a way to smooth out the surface and provide a level surface for painting or other decoration.
In order to get the best results, it is important to understand the process and take the necessary steps to prepare the surface properly.
If you're a home owner, then there's a good chance that you may have to deal with plastering at some point. So what is the process of plastering? In this article, we'll take a look at the steps involved in plastering a wall or ceiling.
Are you looking for a professional plastering company in Melbourne?
Plastering National is a trusted and reliable plastering company that has been servicing the Melbourne and Mornington Peninsula areas for many years. We are experts in both commercial and residential plastering, so no job is too big or too small for us.
Our team of experienced and qualified plasterers will complete your job to the highest standard, ensuring you are happy with the end result.
We offer a wide range of services, so please do not hesitate to contact us today for more information or a free quote.
Visit our website or call us today on 0451 488 119 to get started with your next plastering project!
We'll also discuss some of the pros and cons of using plaster as a finishing material. By the end of this article, you should have a good understanding of what goes into plastering and whether it's right for your home renovation project.
Plaster is ubiquitous, and this groundbreaking mixture of cement, gypsum, sand, and water is widely used in construction, art, and even medicine.
Knowing which type of plaster you need for your home project and learning how to plaster a wall can be considered an advanced do-it-yourself project because there are so many different types of plaster, each with its own set of applications and mixing techniques.
What is Plastering Process
Plastering can be found all over; there are many different types of plastering, each with its own mixing techniques and applications.
As a result, being able to determine which type is best for your project is critical.
This step-by-step guide will show you how to complete the Plastering process.
Plastering is the process of covering masonry/blockwork walls with a mixture of cement and sand, as well as the required amount of water, in the construction of houses and other structures.
The following are the requirements for a good mortar:
- It should be followed in the background and during climatic changes.
- It should be cost-effective.
- It should be tough and long-lasting.
- Plastering should be used in all types of weather.
- It should effectively prevent moisture from penetrating the internal block/structure from the outer surfaces.
- It should be easy to work with.
Type of Plastering:
- Internal Plastering
- External Plastering
Internal Plastering
Internal plastering refers to work done on internal walls that results in a firm and smooth finished surface. To some extent, the plaster acts as a thermal insulator. It serves as a fire-resistant layer.
Preparation of Surface for Internal Plastering
- The wall's mortar joints are left rough to ensure a good bond with the plaster.
- After blockwork masonry/blockwork, any excess mortar should be removed, and all joints should be pointing.
- Pointing is the process of completing mortar joints in blockwork/masonry, whether stone or brick.
- With a wire brush, clean all of the wall's surfaces and joints; no grease, oil, or other residue should be left on the surface.
- Fill any holes or cavities on the surface with concrete ahead of time and let it dry for at least a day.
- Before applying cement plaster, plaster the entire wall and wash the mortar joints for at least 6 hours.
- If the projection on the wall surface is greater than 12 mm, knock it off to achieve a uniform wall surface and save money on mortar.
- Before plastering, all concrete surfaces such as columns, beams, ceilings, and retaining walls must be hacked to ensure proper mortar-surface bonding.
Plaster is a thin layer of mortar applied to the masonry surface that acts as a damp-proof coat. Plastering also provides a firm and smooth finished surface over the masonry, enhancing the building's appearance.
The primary goals of plastering are to protect the surface from atmospheric influences, cover defective masonry work, conceal porous materials, and provide a suitable painting surface.
Plastering Work Specifications Standard Specifications
- ASTM C926 Standard Specification for the Application of Portland Cement-Based Plaster (American Standards)
- Solid plastering – Cement plasters for walls, ceilings, and soffits, New Zealand Standard NZS 4251-1 (2007)
- BS EN 998-1 European Standards Part 1 of the masonry mortar specification is for rendering and plastering mortar.
- IS 383 Specification for coarse and fine aggregates from natural sources for concrete (BIS codes).
- IS 1542 IS 2645 sand specifications for plaster IS 8112 specifies the requirements for integral cement waterproofing compound.
- IS 269 is the specification for 43 grade OPC, and IS 1489 is the specification for 33 grade OPC. Portland Pozzolana Cement Specification
Plastering Work Procedures
Keep all of the wall's mortar joints rough to ensure a good bond with the plaster.
Prepare the entire wall for plastering. With a wire brush, clean all of the wall's joints and surfaces; there should be no oil or grease left on the surface.
If the surface has any cavities or holes, fill them in ahead of time with the appropriate material.
If the surface is smooth or the wall to be plastered is old, rake out the mortar joint to a depth of at least 12 mm to improve the plaster's bonding.
Before applying cement plaster, wash the mortar joints and the entire wall to be plastered and keep it wet for at least 6 hours.
If the projection on the wall surface is greater than 12 mm, remove it to achieve a uniform wall surface. This will reduce the amount of plaster used.
If you're going to try your hand at DIY plastering for the first time, you'll probably want a smooth finish like the pros.
After all, the last thing you want is to have an uneven wall that irritates you every time you see it.
Plastering is an art, and there's a lot to be said for taking the proper steps to achieve that perfect finish, so no shortcuts here!
Each of the six stages of plastering is critical to achieving good results in the end. As a result, we've put together a handy guide that will walk you through each step.
It's time to get started on the six stages after you've prepared the wall for plastering, controlled your suction so the plaster doesn't dry too quickly, and mixed your plaster.
The 6 Stages Of Plastering
Stage 1
You will now apply the first coat of plaster, which should have a thickness of 2 millimetres and cover the entire surface.
Moving the trowel in a long motion, gradually flattening it to the wall while beginning at an angle, with the leading edge of the trowel away from the wall, move the trowel to begin the process. This should be done so that the angle is preserved throughout.
On this first coat, it is more important to get a flat, even coat without any bulges; don't worry about trowel marks or ridges because they will come out later.
Stage 2
When the plaster has reached the point where it has begun to harden, take a clean trowel and smooth out the first coat, making sure that any bumps are removed.
The secret to success here (as with the majority of plastering) is to press down firmly on the wall with your trowel as you move it in long strokes across the surface, and to keep the leading edge of the trowel about 10-15 millimetres away from the surface.
Stage 3
Immediately after the second stage of plastering has been completed, the second coat of plaster is applied. It is very similar to the first stage, with the exception that you are only using half of the plaster, applying half of the thickness, and applying even more pressure in an effort to prevent any holes from appearing in the plaster.
If you make holes, you shouldn't worry too much about it because the next step should hopefully fill them in. The fact that you don't want parts of your plaster to dry out while you work is the primary justification for not making an attempt to patch the holes right now.
Stage 4
Plaster will become tacky and flexible enough to be pushed into the holes; however, you should take care not to let it become too wet, or else you will end up with more holes.
Apply firm pressure and don't be concerned if any ridges form; these will be removed in the next step. Look for holes as you go over the wall, and if any aren't filling despite your trowel's pressure, more plaster can be applied to the hole and flattened. While it's critical to fill the majority of the holes at this point, don't waste too much time and let your plaster dry.
Stage 5
When you reach this stage of the process, you will use the trowel to smooth out any ridges that may have formed in the plaster by applying firm pressure and doing so with the help of your tool.
Widen the angle of your trowel against the wall so that it is at a greater distance from the surface of the wall. This will make it easier to work with the plaster if it is quite firm. To avoid removing the plaster from the wall, however, be careful not to scrape it.
Stage 6
The final stage of the six-stage plastering process should result in a nice, slightly polished surface. It all starts when the plaster darkens as it dries. To finish, apply firm pressure to the trowel and run it over the entire wall. And that's it!
Bullmark Procedure
What exactly is BULLMARK? Is it necessary to do so for both internal and external walls?
BULLMARK is a plaster patch with a thickness of about 10cmx10cm and a thickness of 12-15mm. To get a uniform thickness of plastering throughout the wall surface, place it on the one-end corner of the wall to be plastered.
Bull marks are necessary for achieving a smooth and even surface throughout the plastering process on both internal and external walls.
Fix the Bull mark on the wall first. On one corner, there is a bull mark A.
About two metres away from bull mark A, another bull mark is fixed on the wall, first horizontally, then vertically, covering the entire wall surface.
Using a plumb-bob, check the verticality of the bull mark one over the other.
After the bull mark has been fixed, vertical plaster strips known as screeds are formed between the bull mark. Screeds are used as gauges to keep plastering thickness consistent.
Before casting, we must keep a plan for the bull mark to confirm the thickness of the plastering, which will later be used as a reference.
If the thickness varies by more than one inch, we can suggest double plastering in the design.
The two walls' perpendicularity must be checked, and the bull mark's thickness must be adjusted.
Line Dori are usually placed at right angles (3-4-5 rule) and bull thickness is adjusted on the wall, with the same thickness applied to the entire wall.
A good tile pattern cannot be achieved after flooring if the walls are not perpendicular.
Plastering of Internal Walls
Plaster thickness varies from 9 to 15 mm in brick masonry/blockwork and between 9 and 15 mm in concrete masonry/blockwork.
For plaster, the cement-to-sand ratio ranges from 1:3 to 1:6.
On-site engineers should keep a close eye on the mortar mix ratio.
The only amount of dry mortar (cement-sand mixture) required has been prepared.
Within 30 minutes, the supervisor should ensure that water is mixed into dry mortar for the amount of dry mortar used or consumed.
Using the trowel, apply plaster between the spaces created by the screeds on the wall surface.
External Plastering
External plastering refers to exterior wall plastering in which a layer of cement-sand mortar is applied over the masonry/blockwork, acting as a damp-proof coat over the masonry/blockwork, and the surface finishing is rough.
Single Scaffolding
Make sure the masonry/blockwork is completely finished before beginning the external plaster. Prepare scaffolding for the plastering ahead of time.
A series of vertical bamboo or timber segments are firmly planted in the ground parallel to the wall being built. The bamboo or timber is spaced 2 to 2.5 metres apart and 1.2 metres away from the wall.
At vertical intervals of about 1.2 to 1.5 metres, longitudinal horizontal components called ledgers connect the standards. Rope lashing is used to tie ledgers to standards every 4 to 5 feet rise, and the other end is fitted into a hole in the masonry/blockwork wall.
Double Scaffolding
For better support, double scaffolding has two rows of standards separated by ledgers, as opposed to single scaffolding, which has only one row of standards.
Two rows of standards make up double scaffolding. The first row is fixed close to the wall, while the second row is fixed 1.5 metres away from the first row. The first row of standards is approximately 20 to 30 cm from the wall.
Transoms and cross braces are installed on the ledgers to make the scaffolding stronger and more durable. In masonry/blockwork walls, no holes are drilled.
Double scaffolding is prefered over single scaffolding because it is stronger and more durable, and it eliminates the need to carve holes in structures or walls to support scaffolding.
If the holes are made during single scaffolding, they should be filled with concrete first, followed by the chicken mesh before plastering.
Fill the external side gaps in masonry/blockwork and the beam and wall joints, which were previously impossible to do from the outside without scaffolding.
All internal plumbing lines that are projected out must be packed with concrete and finished.
Following the projection of the plumbing pipes, the holes on the internal side are filled with concrete and waterproofing chemicals such as GP2, ensuring that water leakage is prevented.
Before beginning plastering work, water leakage testing (water ponding and testing) should be performed to avoid the finished plastering breaking later if a water leakage problem arises.
We can easily instal plumbing pipes after plastering without damaging the external plastering.
Remove all unwanted material from the R.C.C. and masonry/blockwork surfaces, including wooden pieces, papers, kathya (rope), and other materials.
Before plastering, wet the surfaces the day before.
Before plastering, make sure to check the top level of the parapet walls.
Check the level, plumb, and line of all the doors and window frames. Before starting the plastering process, any defects are corrected.
Examine all elevation features in relation to the architectural drawing.
Before beginning the external plaster, make level dots (Bullmark).
Clean the R.C.C surfaces with a wire brush if they are affected by efflorescence or green algae.
For all corners of the walls, corners of windows, a line of elevation features, a line of R.C.C. grill, and all straight lines in that portion, place Dori from top slab to bottom level.
Plastering on the outside always begins at the top and ends at the bottom of the structure.
Even if most people would rather leave it to the professionals, if you are handy with reasonable DIY home tasks and know how to work in a slow, systematic, and neat manner, you have come to the right place.
This step-by-step plastering guide will walk you through everything you need to know, and the finished plastered wall should look like it was done by a professional. First and foremost, you must obtain the necessary tools and materials for the job.
Needed Tools And Materials For Plastering
It is always a good idea to plan ahead for wall plastering so that you do not have to scramble for supplies and have to quit the job in the middle of doing it.
The job calls for a variety of tools and materials, including a trowel and a bucket trowel, a plasterers float, a corner trowel, a hawk board, two buckets, a mixing stick or paddle, sufficient plaster, PVA, dustsheets, clean water, sandpaper, a stepladder or stilts, and a dust mask.
Paint the wall with PVA (s)
Because it is a latex-based product similar to the glue that seals the pores of the drywall, applying PVA to the walls that you are about to plaster will ensure that the layer that you will use dries evenly. This can be accomplished by applying PVA to the walls before you plaster them.
To begin, take one part polyvinyl alcohol (PVA), and dilute it with four parts water, using the ratio 1:4. Apply the PVA mixture to the wall using a brush, making sure to cover all of the surface area. Roll the PVA mixture onto the brush. After the PVA glue has been applied to the wall, you can then begin applying the first layer of plaster.
Mix the Plaster
Read the manufacturer's manual for the type of plaster you'll be using for the project and mix it accordingly. When opening the material bags, wear a dust mask. Pour it into a bucket of cold water and whisk it briefly until it resembles thick custard with no lumps. Mix the plaster into the water continuously, not the other way around.
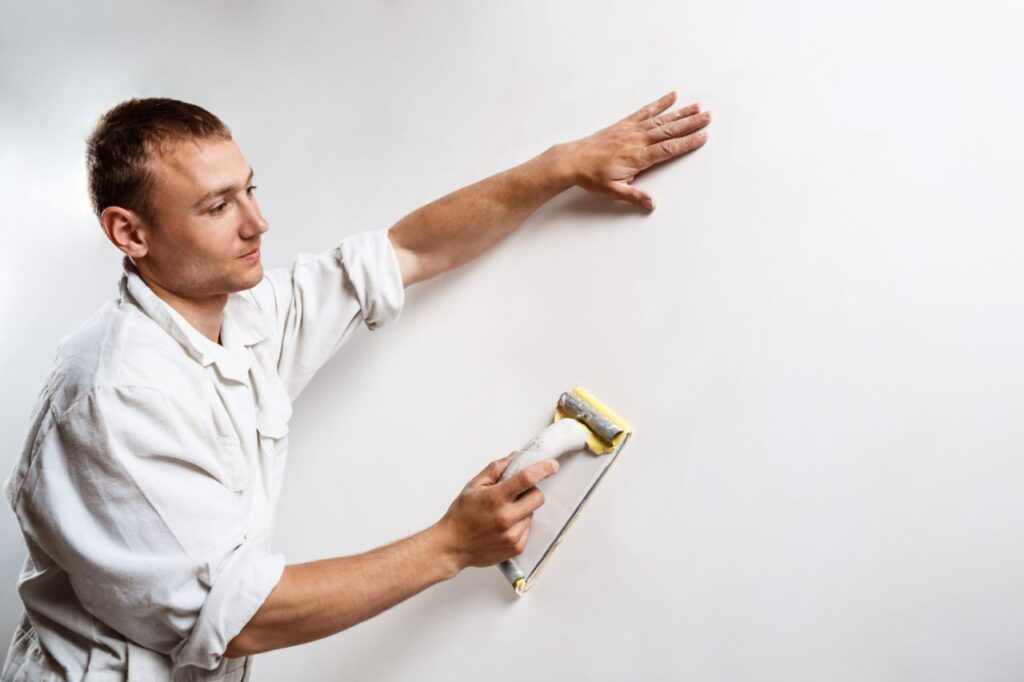
Put Up Plaster On The Walls
You can start applying the first coat of plaster using the hawk board, trowels, and a floating tool once the wall(s) have been cleaned and the plaster mixture has been prepared. Before you start mastering the technique, practise it on separate plasterboard.
Using the trowel, apply plaster to the hawk board, then use the float to push the material from the hawk onto the walls. At the end of each sweep, flatten the float by spreading the plaster firmly upwards.
Always start at the bottom left corner and work your way up, filling a section completely from bottom to top before moving on to the next.
To ensure a smooth look and avoid excess plaster coming off the wall, use small amounts of plaster combined with firm pressure on the float. Rep this procedure until the entire surface has been plastered.
Smooth And Skim
Allow 20 minutes for the first coat of plaster to dry after it has been applied. After that, use a trowel to smooth out any bumps or lumps on the wall. With the corner trowel, smooth out the corners as well as the bottom and top of the wall. These are the most difficult areas to plaster correctly, so make sure you have the right tools.
Scrape
Although scraping the wall before applying the second coat of plaster is optional, most experts recommend it in order for the second coat to adhere properly. A devilling float, a tool specifically designed for this purpose, is the simplest way to scrape the wall. If you don't have one handy, an old kitchen fork can be used to scrape the walls. If you skip this step, make sure the first coat is still wet before moving on to the second.
Apply the Second Plaster Coat
Finish the wall with a second and final coat of plaster (s). This one should have a thinner consistency than the first, so add more water to the plaster mixture. Apply a thin 2 mm layer of plaster to the wall and allow it to dry slightly.
Add the Final Touches
Polish your work once the plaster has dried slightly. Using a spray gun, apply water to the walls. Make sure to spray the plaster's edges and smooth out the surface with inward strokes with the trowel.
Finish with a clean float across the entire wall to smooth out any curves or bumps. Remove any excess material with sanding paper after the plaster has dried completely.
Wallpapering and Painting
Your wall(s) are now ready to be painted or wallpapered, whichever you prefer. Before applying paint, prime the surface with undercoat. The same is true if you're about to hang wallpaper, though a wallpaper adhesive may be preferable. Make sure to prime and seal the surface with two coats of adhesive.
There you have it! Even though most people prefer to leave plastering to the professionals, with our detailed step-by-step guide, you'll be plastering like a pro in no time. We hope you found this article helpful and are ready to put it into practise. Best wishes.
Conclusion
The process of applying a thin layer of plaster to a surface, such as a wall or ceiling, is known as plastering.
This is done as a means of smoothing out the surface and providing a level surface that can be painted on or decorated in some other way.
Are you interested in hiring a reputable company that specialises in plastering? Get in touch with us as soon as possible for further information or a no-obligation estimate.
Plastering is a process in which a very thin layer of mortar is applied to the surface of the masonry. This layer serves as a damp-proof coat.
Plastering has several purposes, the most important of which are to shield the surface from the effects of the environment, to conceal porous materials, to cover faulty masonry work, and to create an appropriate surface for painting on.
Plastering is a process that consists of six stages, and we've put together a helpful guide that will walk you through each stage.
Using a wire brush, thoroughly clean all of the joints and surfaces of the wall to ensure that there is no oil or grease residue left on the surface.
Wash the mortar joints and the entire wall that will be plastered with cement before beginning to apply the plaster. You will now apply the first coat of plaster, which should have a thickness of two millimetres and cover the entire surface.
The key to success in this endeavour (as well as in the vast majority of plastering projects) is to press down firmly on the wall with your trowel while moving it in long strokes across the surface of the material.
Throughout the entire process of plastering, bull marks are required on both the interior and exterior of a building's walls in order to achieve a smooth and even surface.
The bull mark is a plaster patch that is approximately 10 centimetres by 10 centimetres and has a thickness of 12 to 15 millimetres. Screeds are gauges that are used to maintain a consistent thickness of the plastering. In brick masonry and blockwork, the thickness of the plaster can range anywhere from 9 to 15 millimetres.
The ratio of cement to sand that is used in plaster can range anywhere from 1:3 to 1:6. Get the scaffolding ready ahead of time so you can start plastering.
Two rows of scaffolding standards are separated by ledgers to form double scaffolding.
After the plastering is complete, it will be simple for us to instal the plumbing pipes without causing any damage to the exterior plastering.
It is important to perform water leakage testing, also known as water ponding and testing, in order to prevent the finished plastering from cracking in the future in the event that a water leakage problem develops.
When plastering the exterior of a building, one always starts at the top and works their way down to the bottom of the structure.
PVA is a product that is based on latex and is very similar to the glue that is used to seal the pores in drywall.
Blend together one part polyvinyl alcohol (PVA) and four parts water, and then briefly dilute the mixture until it has the consistency of thick custard. Instead of beginning with the water and working your way up to the plaster, start with the plaster.
Plastering is a job that the majority of people would rather not attempt, but with the help of our comprehensive and step-by-step guide, you'll be able to plaster like a pro in no time.
After applying the first coat of plaster, wait twenty minutes for it to completely dry before proceeding. To scrape the wall, you should make use of a tool known as a devilling float, which was developed specifically for this activity.
Content Summary
- The process of applying a thin layer of plaster to a surface, such as a wall or ceiling, is known as plastering.
- It is essential to have an understanding of the procedure and to carry out the necessary steps in order to correctly prepare the surface in order to achieve the best possible results
- Plastering is a process; therefore, how does it work
- In this piece, we'll take a look at the various steps that must be taken in order to properly plaster a wall or ceiling.
- Because there are so many different kinds of plaster, each of which has its own set of applications and mixing techniques, knowing which kind of plaster you need for your home project and learning how to plaster a wall can be considered an advanced level DIY project. This is because there are so many different types of plaster.
- As a consequence of this, it is essential that you have the ability to determine which type will work best for your project.
- You will learn how to finish the plastering process by following this detailed guide step by step.
- Plastering is the process of covering masonry or blockwork walls in the construction of houses and other structures with a mixture of cement, sand, and the required amount of water. Plastering can also be used in other types of construction.
- In advance, use concrete to fill any holes or cavities on the surface, and then give the concrete at least a day to dry out completely.
- Plaster the entire wall with regular plaster and wait at least six hours before washing the mortar joints. Only then should you apply cement plaster.
- To achieve a uniform wall surface and save money on mortar, you should knock off any projections on the wall surface that are greater than 12 millimetres in height.
- To ensure that the mortar bonds properly to the surface, all concrete surfaces, including columns, beams, ceilings, and retaining walls, must be hacked before the plastering process can begin.
- Plaster is a very thin layer of mortar that is applied to the surface of the masonry and serves as a coat that prevents dampness.
- Portland Pozzolana Cement Specification
- To ensure a strong bond between the plaster and the wall, keep the mortar joints in the wall's construction rough.
- Plastering will require that the entire wall be prepared.
- Rake out the mortar joint to a depth of at least 12 mm to improve the plaster's bonding. This is especially important if the surface to be plastered is smooth or if the wall to be plastered is older.
- If this is going to be your first time trying your hand at DIY plastering, you will most likely want to achieve a smooth finish just like the professionals.
- Plastering is an art, and there is much to be said for taking the proper steps to achieve that perfect finish; therefore, there are no short cuts to be taken here.
- Plastering is a process that consists of six stages, each of which is essential to achieving satisfactory results in the end.
- As a result of this, we have compiled a helpful guide that will take you through each step of the process.
- After you have prepared the wall for plastering, adjusted your suction so that the plaster does not dry out too quickly, and mixed your plaster, it is time to begin the six stages of the process.
- You are now going to apply the first coat of plaster, which should have a thickness of 2 millimetres and cover the entirety of the surface.
- Take a clean trowel and, once the plaster has reached the point where it has begun to harden, smooth out the first coat, making sure that any bumps are removed.
- The key to success in this endeavour (as well as in the majority of plastering) is to keep the leading edge of the trowel about 10-15 millimetres away from the surface while pressing down firmly on the wall with your trowel as you move it in long strokes across the surface. This will ensure that the plaster adheres properly.
- The application of the second coat of plaster occurs almost immediately after the completion of the second stage of plastering.
- The primary justification for not attempting to patch the holes right now is the fact that you don't want parts of your plaster to dry out while you work. This is the reason why you shouldn't try to patch the holes right now.
- It is not necessary to worry if ridges appear because they will be eliminated in the following step after firm pressure has been applied.
- Keep an eye out for any holes as you work your way over the wall; if you find any that aren't filling despite the pressure of your trowel, you can add more plaster to the area and then smooth it out.
- Although it is essential to plug the majority of the holes at this stage, you shouldn't linger too much because you need to give the plaster time to dry.
- When you have reached this point in the process, you will use the trowel to smooth out any ridges that may have formed in the plaster by applying firm pressure while also doing so with the assistance of your tool.
- Adjust the angle of your trowel so that it is further away from the surface of the wall. This will allow you to remove more material from the wall.
- Be very careful not to scrape the plaster on the wall, as this will result in its removal from the wall.
- A pleasant and maybe even slightly polished surface ought to be the end result of the sixth and final stage of the plastering process.
- When the plaster begins to darken in colour as it dries, everything begins to take shape.
- To complete the task, exert a forceful amount of pressure on the trowel, and then move it across the entire wall.
- If you want the plastering to have the same thickness all the way across the wall surface, start by placing it in the corner of one end of the wall that is going to be plastered.
- Throughout the entire process of plastering, bull marks are required on both the interior and exterior of a building's walls in order to achieve a smooth and even surface.
- Another bull mark is attached to the wall approximately two metres away from bull mark A. This bull mark is fixed first horizontally, then vertically, covering the entire surface of the wall.
- Verify with the help of a plumb bob that the bull marks are positioned vertically one atop the other.
- Following the installation of the bull mark, vertical plaster strips, also known as screeds, are formed between the bull mark.
- Screeds are gauges that are used to maintain a consistent thickness of the plastering.
- In order to confirm the thickness of the plastering prior to casting, we need to keep a plan for the bull mark. This plan can then be used as a reference in the future.
- It is necessary to check that the two walls are perpendicular to one another, and also to adjust the thickness of the bull mark.
- Line Dori are typically installed at right angles according to the 3-4-5 rule, and bull thickness is adjusted on the wall to achieve a consistent thickness across the entire wall.
- Within the first thirty minutes, the supervisor is responsible for ensuring that the appropriate amount of water is mixed into the dry mortar corresponding to the amount of dry mortar that has been used or consumed.
- Plaster should be applied with the trowel into the spaces between the screeds that have been created on the wall surface.
- Plastering done on the exterior of a building is referred to as "external plastering." This type of plastering involves applying a layer of cement-sand mortar over the masonry or blockwork. This layer acts as a damp-proof coat over the masonry or blockwork, and the surface finishing is rough.
- Before beginning work on the exterior plaster, check to see that the masonry or blockwork has been finished in its entirety.
- Get the scaffolding ready ahead of time so you can start plastering.
- Double scaffolding, as opposed to single scaffolding, which only has one row of standards, features two rows of standards that are partitioned from one another by ledgers. This configuration provides superior support.
- Double scaffolding consists of two rows of scaffolding standards.
- Because it is stronger and more durable, double scaffolding is prefered over single scaffolding. Additionally, there is no need to carve holes in structures or walls in order to support the scaffolding when using double scaffolding.
- It was previously impossible to do from the outside without the use of scaffolding, but now you can fill the external side gaps in masonry/blockwork as well as the beam and wall joints.
- All of the internal plumbing lines that project outward must be encased in concrete and brought to a satisfactory conclusion.
- Before beginning work on the plastering, it is important to perform water leakage testing, also known as water ponding and testing, in order to prevent the finished plastering from breaking in the future in the event that a problem with water leakage occurs.
- After the plastering is complete, it will be simple for us to instal the plumbing pipes without causing any damage to the exterior plastering.
- Before you begin to plaster, you need to make sure that the top level of the parapet walls has been inspected.
- Before beginning the process of plastering, any flaws are fixed that have been found.
- This plastering guide will walk you through everything you need to know, and the wall that you plaster should look like it was done by a professional by the time you are finished.
- To begin, you have to make sure that you have all of the appropriate equipment and supplies for the job.
- Equipment and components required for the plastering process
- It is always a good idea to plan ahead for wall plastering so that you do not have to scramble for supplies and have to quit the job in the middle of doing it. If you do not plan ahead, you may find that you have to scramble for supplies.
- PVA can be applied to the walls before plastering them, which will allow this goal to be accomplished.
- Make sure that you cover all of the surface area of the wall with the PVA mixture when you apply it to it with a brush on it.
- To apply it to the brush, roll the PVA mixture onto it.
- When you have finished applying the PVA glue to the wall, you can then start applying the first layer of plaster.
- You should mix the plaster in accordance with the instructions provided in the user manual for the specific type of plaster that you will be employing for the project.
- Instead of beginning with the water and working your way up to the plaster, start with the plaster.
- After the wall (or walls) have been cleaned and the plaster mixture has been prepared, you can begin applying the first coat of plaster using a hawk board, trowels, and a floating tool. Once this has been done, the first coat of plaster can be applied.
- Plaster should be applied to the hawk board with the trowel, and then the float should be used to transfer the material from the hawk onto the walls.
- After applying the first coat of plaster, wait twenty minutes for it to completely dry before proceeding.
- After that, you should make use of a trowel to smooth out any bumps or lumps that may be present on the wall.
- Use the corner trowel to make the walls' corners, as well as their bottom and top surfaces, as smooth as possible.
- Because these are the areas that are the most difficult to plaster correctly, you need to make sure that you have the appropriate tools.
- Scrape The wall Even though scraping the wall before applying the second coat of plaster is optional, the majority of experts recommend doing so in order to ensure that the second coat adheres correctly.
- The easiest method for scraping the wall is to use a devilling float, which is a tool that was developed expressly for this function.
- If you don't have a putty knife on hand, you can scrape the walls with an old kitchen fork instead.
- Apply a second and final coat of plaster to the wall as the finishing touch (s).
- Plaster the wall with a layer no thicker than 2 millimetres and wait for it to become slightly dry.
- After the plaster has had a chance to partially dry, polish the work.
- Water should be sprayed onto the walls using a spray gun.
- Be sure to spray the edges of the plaster, and use the trowel to make the surface as smooth as possible by moving in a circular motion.
- After the plaster has completely dried, use sandpaper to remove any excess material that may have been left behind.
- Your wall (or walls) are now prepared for either painting or wallpapering, depending on your personal preference.
- Applying an undercoat as a primer to the surface comes before actually painting it.
- Be sure to apply two coats of adhesive to the surface after priming and sealing it first.
- Plastering is a job that the vast majority of people would rather not attempt, but if you follow our comprehensive and step-by-step guide, you'll be able to plaster like a pro in no time at all.