We are pleased to welcome you to our in-depth guide on plaster, in which we cover everything you must know about this critical construction material.
We will cover everything you need to know about it, from its history, functions, and various available types.
Evidence of the usage of plaster may be found as far back as ancient Egypt, indicating that it has been in use for a very long time.
The Greeks and Romans employed plaster for decorative and structural purposes, and both cultures used this material.
Plaster was utilised to a significant degree in building various structures, including churches, castles, and other structures, across mediaeval Europe.
Painters frequently utilised plaster as a painting material; frescoes were often created by artists working with plaster.
Guide to Plastering a Wall
https://www.wikihow.com/Plaster-a-Wall may save you a lot of time and work, not to mention increase your satisfaction with the end product.
This is one of the many reasons why learning how to do it properly is so important.
To begin, when you plaster a wall, ensure that you follow the six phases of plastering correctly, keep your equipment clean, and have the appropriate kit on hand.
The last thing you want is imperfections on your wall that will irritate you for years.
If you want to avoid this, make sure that you follow these steps.
We have compiled the definitive guide to plastering a wall, which will walk you through the steps required to take, show you what you need, and explain exactly how to master the ideal layer of plaster – with some helpful hints and tips sprinkled in along the way!
How to Plaster a Wall Step by Step
If you're not used to working with plastering tools, utilising a hawk and trowel efficiently may be tricky when you first start.
Therefore, before you apply the first layer of plaster to the wall, you should have some experience working with them to avoid making a mess of things.
Make sure your wall is clean before you begin by removing particles of previous plaster, dust, or wallpaper as you go.
Additionally, check your wall's suction to ensure it is not too porous.
If this is the case, it will draw the moisture out of the plaster so quickly that it won't have enough time to do its job before it dries out completely.
Therefore, you should manage the suction of your wall using water or PVA.
This should satisfy the thirst of the wall, preventing it from taking moisture from your plaster excessively quickly.
If you want to avoid having to continually reach down to re-wet your brush while you are wetting your walls, a great piece of advice is to use a fine mist spray pistol.
When the water runs down the wall, you will know the suction has been successfully regulated.
Backgrounds with a low suction, such as painted surfaces, must also be adequately prepared.
This can be done, for example, by applying a mixture of PVA glue and water to the wall to ensure that the plaster adheres to the wall.
You could also add a handful of sand to the mixture of PVA glue to give it a coarser texture and improve its stickiness when you apply the PVA.
This would be an alternative method. After that, you can begin the process of plastering the wall.
The ratio of water to plaster in the mixture is approximately 50/50; hence, one bucket of clean water should be used to make one full plaster.
When you are finished mixing the plaster, it should have the consistency of thick cream, and there should be no lumps.
To begin, attempt to add just enough dry plaster to produce a heap on top of the water, and the dry plaster must be added TO a bucket of clean water rather than the other way around.
After that, you can slowly mix your plaster using a unique paddle or mixing stick, but you should always have another bucket of water handy if you need to clean your instruments.
Working hard to remove hard plaster from your tools at the end of the project is not very enjoyable.
There are three primary stages, which I will describe as follows:
Being familiar with the various plastering tools and ordinary do-it-yourself tools available.
adequately prepare the area of your internal walls that will be plastered (failing to do this appropriately might lead to disastrous consequences).
Putting up plaster on your walls.
There is a lot of information to take in, but by the time we finish this video, I hope you will be prepared to gyprock a wall.
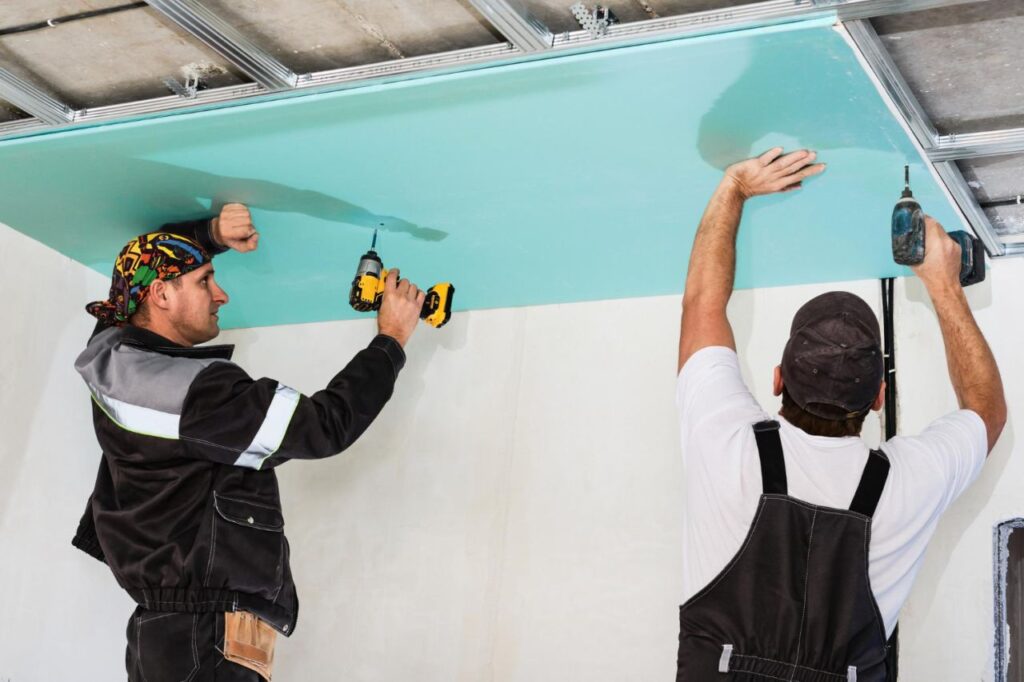
Part 1 – What Specialist Plastering Tools and Equipment Do You Need to Plaster a Wall or Ceiling?
You will need the appropriate tools before you begin the plastering process.
As with anything else, you need to be sure you have the right equipment for the task.
You'll need these five primary tools to get started with the skimming process.
These are the most fundamental instruments that you will require.
As you get more experience and skill, you will notice an expansion in the range:
- A trowel for applying mortar, preferably made of stainless steel.
- Trowel-shaped bucket
- Hand board/Hawk Board
- Mixer
- Water brush
- Plastering Trowel
This is, without a doubt, the most essential piece of equipment.
The Plastering Trowel will have the most significant impact on the outcomes you achieve.
Some old fellas will tell you that it doesn't matter what trowel you use as long as you "just get it on the wall!"
They are just wrong!
You can't get by without a good trowel, especially when just starting.
I suggest having a conversation about this with the employees that work at the hardware store near you.
However, in most cases, you will want to select one that is not excessively large and is manufactured from stainless steel.
They are less cumbersome, require less effort to maintain, and are simpler to use.
If you want to avoid spending money on a stainless steel trowel, all you have to do is make sure you don't choose the least expensive option.
It won't be worth it, and you won't get the benefits you should expect!
- Bucket Trowel
This one isn't quite as vital as the other.
The primary purpose of this device is to scoop plaster from the bucket onto your hawk (or hand board, depending on where you're from), which is the tool's name according to your location.
You don't need to get the most expensive of these options.
You can get a bucket trowel for sale at almost any hardware store, and despite their low price, you should invest in one.
- Plasterer’s Hawk/Hand Board
Another one of the essential ones, this one is significant because it is the instrument that retains your plaster.
Without a hand board, you must apply the plaster by hurling it at the walls.
There are a lot of choices, but the foam or plastic hawk is the finest for beginners.
They are not heavy and are simple to operate.
Because the plaster might become quite heavy on your forearms, this is a vital step to do when you first begin.
Imagine spending the entire day with one arm resting on a wall while carrying a hawk that is full of plaster.
Plastering may be laborious, so even if you can reduce the work you must do by a small amount, you will feel much more content.
Another advantage of going for a foam or plastic hawk is that they are typically relatively affordable.
The one drawback, however, is that they do not have very good structural integrity.
They won't last forever but serve their purpose well while you get the hang of things.
- Mixer
The days are long gone when our only tools were a spade and a hammer.
Because of technological advancements, we are now significantly more productive.
You absolutely must go out and purchase a high-quality plaster mixer.
Mixing the plaster will only take half the time and require very little work. Additionally, this will result in a finer and smoother overall mixture.
- Water Brush
Plastering requires a variety of instruments, one of the most important of which is a high-quality water brush.
It will prevent your edges from becoming dirty, allow you to splash water over your plaster, and give your walls a flawless finish.
You can get a cheaper brush, but spending a little bit more money on a brush is more beneficial.
A low-quality brush can leave bristle marks on your wall and may cause more hassle than it's worth in the long run. Because of this, I suggest investing in a genuine decorator's brush.
Even though I've had one for nearly two years, there are no visible indications of wear on it.
They can be expensive, but the additional cost is well justified.
In addition to that, you are going to require a brush to clean all of your gear.
In most cases, I will use a high-quality hand brush because these brushes typically have narrow bristles to fit in the spaces between the paddles of your mixer.
Plastering is one of those jobs where keeping your tools clean is one of the most vital tasks. If you treat your instruments with respect, they will treat you with respect in return.
When you first begin your adventure into the plastering world, you will find that these items are absolutely necessary.
You will ultimately purchase more, but this is the minimum you should invest in.
Part 2 – Prepare Your Walls for Plastering
Now that you have the instruments, you must educate yourself on properly preparing the area.
When I was getting trained to work with plaster, my supervisor always used to say something that has stuck with me to this day: "Failing to prepare is preparing to fail."
As a result of a lack of regard for this aspect of the job, I have witnessed complete sheets of plaster collapse to the ground.
This is important because getting it incorrect leads to many complications.
Because of this, I will take you step by step through the preparation process so that you can have the best possible foundation for skiing.
You are required to take the following actions in order:
- Wallpaper in a strip
- Scrub the surfaces of the walls.
- Fill up any gaps with scotch tape.
- PVA/Blue Grit
- Strip Wallpaper
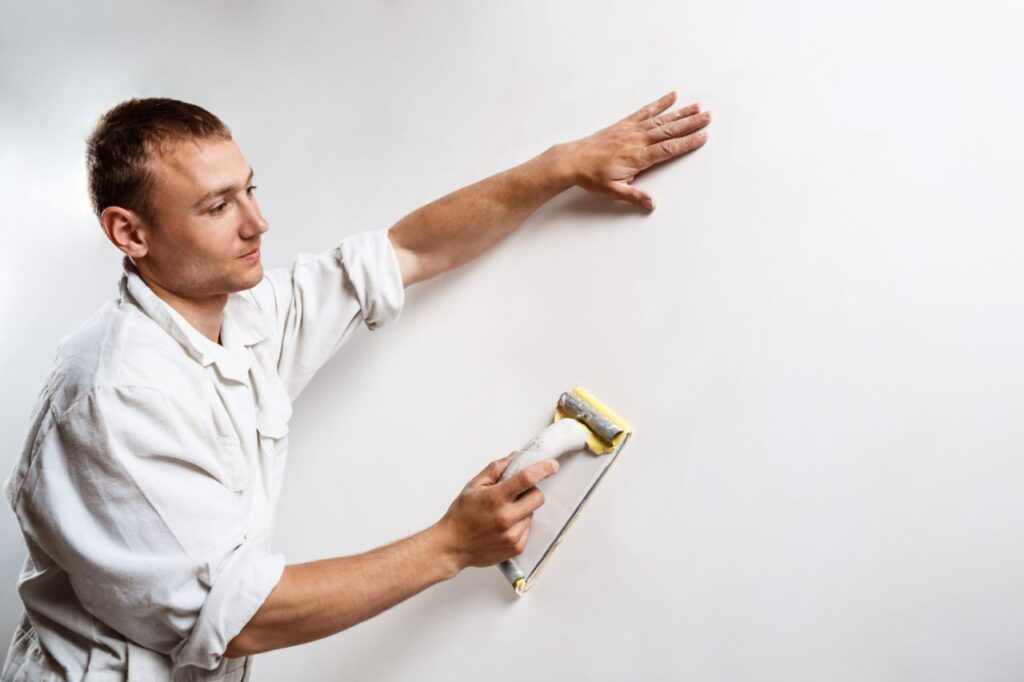
When to Start Smoothing Your Plaster Out
It is unnecessary to bother smoothing out the plaster until the wall has been covered and you have given it some time to become firmer.
As soon as it is ready, move your trowel over the plaster to eliminate any trowel lines and remove any excess plaster as you go.
You will need to reattach this to your hawk, which will typically come in handy for closing any gaps that may have been left.
When carrying out this task, ensure that you work in a variety of directions so that you can cover the entire space.
An excellent firm press will help you obtain a better finish, but it's crucial not to press too hard, or you'll damage the plaster.
You'll also need to apply more pressure to your trowel during this phase.
This will help you achieve a better surface.
If there are any holes, you can fill them in with other plaster.
As stated, the goal is to create a relatively smooth base for the next coat of plaster, but it does not have to be perfect.
The vast majority of trowel lines need to be eliminated, gaps need to be filled in, and generally, just a good even base has to be created.
This is one of the occupations people have disliked the most throughout the history of the human race (painting skirting boards is another one).
It is common knowledge that removing wallpaper is highly tedious and laborious.
Unfortunately, it is an essential step in prepping your walls.
If you choose to plaster over paper, this will occur: after applying the plaster to your walls, you will notice that everything looks fantastic.
You proceed to apply the second layer, and what do you find then?
It seems fine even now. On the other hand, the impacts will start to become apparent.
You may observe the plaster developing tiny little bubbles.
You might next notice bits of the plaster dropping to the ground below.
All of your hard work was for nothing as time went on.
In the end, you will likely be required to scrape off all the plaster currently on the walls and begin the process from the beginning. (If you don't do that, your walls will dry out, and the plaster will fall to the floor regardless, which is a worse outcome.)
This occurs because the wallpaper absorbs all of the moisture from the plaster, at which point it detaches itself from the wall.
Because of this, you must take down ALL of the paper on your walls.
It is difficult to work and pretty monotonous, but it will not be worth the trouble it causes in the long term.
- Wash the Walls Down
Washing down your walls is something that isn't always required, but it is something that I recommend doing.
Grime and filth may accumulate on the walls of your home over time.
It may not seem like much, but I'll give you an example of where things went wrong for me, even if it doesn't sound like much.
Plastering a ceiling was a task that was not overly complicated to complete.
I prepared the walls and did everything just as it was instructed.
Everything, with the exception of the fact that I did not clean the ceiling thoroughly before I began.
I glanced at the ceiling, and everything seemed in order.
After being gone for a few days, I returned and found that the freshly plastered ceiling had a sizable bump in the middle.
When I looked more closely, I noticed a giant bubble at the location where the plaster had failed to adhere to the surface.
The entire ceiling had fallen to the ground in less than two minutes. Disaster!
Plaster couldn't adhere to the ceiling since there was essentially a coating of filth covering it.
To prevent something similar from occurring in your home, I recommend washing the walls with sugar soap, combining it with water, and then applying it to the region that will be the focus of your renovation.
This will eliminate any filth that may be present on the surface and protect your plaster from any potential problems. (Although it may appear annoying, it produces an excellent plaster base.)
- Scrim Tape Any Cracks
In its most basic form, scrim tape is a mesh typically adhered in the spaces between the joints of plasterboards.
This permits the natural movement that occurs in your home and keeps the plaster from cracking as a result of it.
You should use scrim tape on any cracks in your walls.
The scrim tape will prevent the completed plaster from being disturbed in case any movement causes the crack to become damaged.
- PVA
How to PVA a Wall Before Plastering?
You will not need to use PVA unless you are plastering over a wall that already has plaster on it, or if you are plastering over a surface with minimal suction, such as a painted surface that has been glossed over.
Plastering directly onto raw plasterboard eliminates the need to use PVA as a binder.
A solution of PVA and water with a ratio of 3:1 directly to the wall can be done by painting it.
The solution will aid in sealing the wall and form a "key," which will improve the suction, allowing your plaster to stick to the wall more effectively.
It is essential to cover the entire wall; as it begins to feel sticky, you should start plastering it.
You can also purchase specific primers that resemble grit and perform better.
In addition, some primers are coloured, allowing you to visually inspect the surface to ensure that you have coated every area.
The application of PVA to your walls is considered to be standard practice.
It was bizarre when I first learned about plastering, but this is an excellent development for the industry.
Every wall has its extraordinary rate of suction, which may be considered the quantity of water vapour that a material can take in.
To give one example, Brick has a higher high suction rate... If you splash water on the brickwork and let it sit there, it will disappear in two minutes.
However, if you throw the same amount of water against an old wall, you will notice that very little water is absorbed.
If you use regular finish plaster on brickwork, you will likely find that the mixture quickly becomes solid, eventually breaking.
This may be expected if you decide to do so.
This is due to the fact that the brick absorbed all of the moisture that was there in the plaster, which led to the thistle breaking.
PVA helps ease the process of plastering by reducing the rate of suction.
If you merely start plastering onto a wall without using PVA, the plaster will cure quickly, leaving you with little time to create an excellent finish.
Because of this, it is essential to use PVA because it will buy you more time to get the desired results.
PVA allows the plaster to adhere to the walls, another advantage of using it.
Many different brands of PVA are available, so verify with your supplier and ensure that you always follow the directions provided by the manufacturer.
On the other hand, you should combine one part PVA with three parts water, give the mixture a good mix, and then simply roll it all over your walls.
It is not the most pleasant job in the world, and the PVA glue will most likely get all over your hands and arms, but you have no choice but to carry it out.
You should combine one part PVA with three parts water, thoroughly stir the mixture, and then just roll it all over your walls.
It's not the most desirable job in the world, and I suggest you end up with PVA glue all over your hands and arms.
Before you can start plastering, you will first need to wait for the first layer to completely dry, after which you will need to apply a second coat.
You might discover the PVA is tacky or sticky just before it dries.
Plasterers use the term "tacky" to describe this quality.
At this point, you should begin applying the plaster to the walls and getting your mix ready to use.
When your walls have a slight stickiness, this is the optimum moment to begin skimming since the plaster will bind to the PVA and will have a better relationship with your walls during this stage.
When your walls have a slight stickiness, this is the optimum moment to begin skimming since the plaster will bind to the PVA and have a better relationship with your walls during this stage.
Plastering entails three distinct phases, with the third and final phases being the most crucial.
If you have reached this point, the preparation is finished, and it is time to begin skimming.
At last, the time you've been waiting for has arrived: you can apply the plaster to your walls.
The first thing that needs to be spoken about is the process of mixing the plaster.
I suggest studying plaster for the task; going to a local paint store or hardware store is a good option.
About one full pail of water is required for every bag of plaster used.
The optimum consistency is achieved when I combine a whole bucket of water with an additional litre, making the total volume approximately 12.5 litres.
Always start by adding water, then gradually include plaster into the mixture.
It is preferable to begin by adding one-third of a bag of plaster, then mix the plaster using the mixer, and finally add the remaining two-thirds of the bag while continuing to mix.
Last but not least, incorporate the remaining one-third and complete the mixing.
This prevents any plaster from sticking to the bottom of your bucket while ensuring you have a decent mix to work.
Always use clean water, and never mix the plaster in a dirty bucket, as this increases the likelihood that the plaster will harden more quickly.
You should strive for the plaster to have the consistency of melting ice cream, and you should be able to hold the mixture on the bucket trowel without sliding off when the level is applied.
Always make sure you check the expiration date on the plaster.
Don't use it if the expiration date has passed; utilising a batch of tainted plaster is one of the worst things you can do to your home.
If you follow these easy instructions, you will end up with an excellent mixture for plastering.
You can now begin your journey.
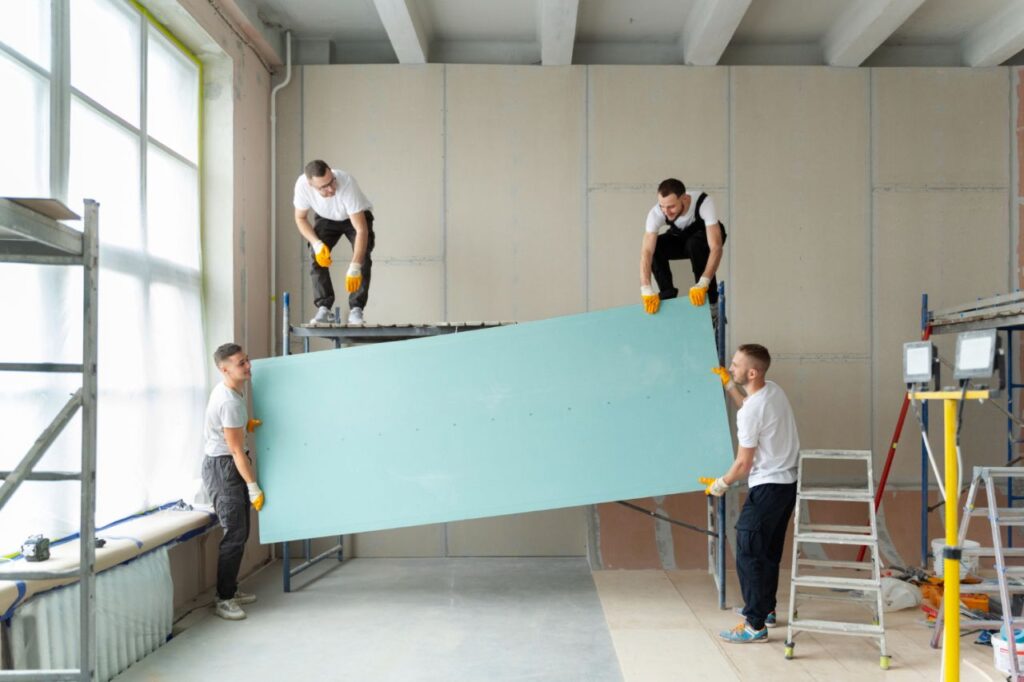
The following steps accomplish plastering:
- The first layer of plaster
- The second layer of plaster
- Flatten your plaster
- 1st trowel placed on top of 2nd trowel
- The finishing touches
The Ultimate Guide to Venetian Plaster
Plaster from Venice is a type of plaster famous for its use in the construction of buildings in Venice, Italy, a city recognised for its Gothic and Renaissance-inspired architecture (via Architecture of Cities).
However, the component can also be utilised in contemporary interior design in specific applications.
The coating begins as a putty created from powdered limestone and water.
In many cases, dyes are added to the putty to generate a colour that has been pre-selected.
This texture is perfect for layering onto various surfaces, including walls, and works exceptionally well.
As it dries, it generates a coating that is both long-lasting and versatile, as it can be sealed and polished to provide virtually any gloss.
Plaster is used extensively in contemporary architecture and interior design because of its adaptability, which makes it quite frequent.
You can buy it in stores or online under various brand names, including Coccio Pesto Mortar, Marmorino, Stucco Veneziano, and plain old Lime Putty.
According to Surfaceform, this stucco was developed to recreate the look of rarer and more costly materials without sacrificing a wall's overall quality and beauty.
If you are interested in installing this plaster or using it in the future, research how it is manufactured, what your alternatives are, and other professional recommendations that will help you better fit it into the design or decor of your home.
How Is Venetian Plaster Made?
By gaining a grasp of the production process for Venetian plaster, one can gain a greater understanding of the plaster's composition, quality, and aesthetic look.
Plaster Artistry suggests that Venetian architects started using this plaster because traditional building materials were too heavy to ship over the water.
This was the case in Venetian architecture.
Using lightweight materials rather than heavy stone made more sense because Italy is a peninsula surrounded by water, and Venice is a city primarily connected through canals.
Historical artisans traditionally made the putty used in Venetian plaster by heating up limestone and then combining it with water.
The goal was to develop a more lightweight product that gave the impression of being made of expensive marble.
Over hundreds of years of evolution, people added new components to subtly change the overall composition, colour, and shine depending on the circumstances.
In addition, many producers have switched from employing traditional limestone to using acrylic or gypsum as an alternative (though WCC).
Marble dust is a popular extra component that gives Venetian plaster its signature sheen.
This is because the appearance and texture of Venetian plaster are meant to mimic that of genuine marble.
The Benefits of Venetian Plaster
The aesthetic appeal of Venetian plaster is the critical factor contributing to its popularity among interior designers and architects.
According to Artistic Renditions, this material possesses depth and complexity that cannot be found in other plasters and paint jobs.
Altering the plaster's overall composition and using various paints and finishes, as well as other techniques, can also allow you to modify the colour and pattern of the plaster.
You should be aware of the other exceptional benefits and the visual advantages of using this form of stucco.
Due to the fact that it has a permeable composition, it is naturally resistant to mould and mildew, even if it has not been treated or finished in any specific way.
When exposed to high humidity and moisture levels, the mixture of limestone and acrylic resin dries out very rapidly, preventing water from settling in.
Plaster from Venice that is made with lime and other natural ingredients is considered to be environmentally friendly.
Plaster like this is typically placed in several layers, which results in the material having an insulating characteristic.
If your home is adequately insulated, it will be much simpler for you to keep the temperature inside your home at a comfortable level because warm air and cold air will not be able to escape or enter the home as quickly.
This can make your heating, ventilation, and air-conditioning system more efficient.
What You Need to Know to Start a DIY Venetian Plaster Project
DIY fanatics will be overjoyed to learn that the Venetian plaster finish may be installed on one's own without the assistance of a professional.
It is unlikely that the final results will be as impeccable and faultless as the work done by a professional contractor.
Still, it is feasible to do a decent job if the appropriate tools and amount of patience are utilised.
Meoded, a company that specialises in paint and plaster, provides a list of the tools and materials required to complete the plasterwork on your own.
One of the most essential pieces of advice they have given is to wear protective gear, also called personal protective equipment (PPE).
These goods are essential to ensuring that you do not put yourself in harm's way throughout the process.
If you don't already have a pair of work gloves or safety goggles at home, consider investing in each pair.
People who are particularly sensitive to paint or who have respiratory disorders may also want to consider purchasing a respirator or gas mask so that they avoid inhaling any fumes or microscopic particles that may be present.
In order to apply the plaster, you will also need a trowel or spatula made of stainless steel, many paintbrushes or rollers for brushing paint and finishes, and a set of paint trays to hold the necessary substances.
Plasterwork requires a primer, the plaster or stucco mixture, natural or synthetic colourants, and a wax finish.
If you want to do a complete job, you will need all of these materials.
Bear in mind that to complete this project, numerous layers of plaster, paint, and sealants will need to be applied, and you will need to wait for each layer to cure before moving on to the next step.
As a result, this project will take more than one day and cannot be finished in a single sitting.
The Steps for Applying Venetian Plaster
You have to make sure you have a clean working area set up before you can start the real application procedure.
Placing tarps and tape over your floors, walls, and close furniture will protect them from plaster and paint splatters.
This will also keep your belongings from becoming damaged.
You should, however, transfer the furniture and decorations in the room where your project is taking place to another room if you can or have assistance available.
In addition to this, you will want to ensure that your working environment has adequate ventilation.
During the procedure, ensure that all of the room's doors, windows, and vents are open, and set up fans to assist with ventilation.
If you work with an expert, you can simplify their task by carrying out these steps in advance.
You must know that if you plan on remodelling your walls, the experts at Vasari Lime Plaster and Paint recommend that you patch any holes or fractures in the surface of your plaster project.
After that, a coat of acrylic or water-based primer should be applied to the material. Following the application of the primer, the first layer of plaster is next smoothed on using a trowel or a spatula.
Applying multiple coats to produce the desired colour or texture may be necessary.
Naturally, the time required to complete the operation will increase proportionately with the number of layers applied.
After applying the final layer, you must wait at least twenty-four hours before applying the topcoat. Sealers that are natural or synthetic can be used for this task.
Some of these sealers may have additional waterproof capabilities, while others may have decorative effects that improve the look of the Venetian plaster.
Conclusion
The information regarding the essential tools required to begin plastering is included in this text.
These include a foam or plastic hawk, a plaster mixer, a water brush, and a brush to clean all the tools.
These are the most crucial aspects of this text.
It is essential to remove the wallpaper from the walls, wash them down, scrim tape any cracks, and use PVA and blue grit to make flawless ground for skimming before plastering the walls.
Only then will the walls be ready for plastering.
Because failing to prepare is the same as planning to fail, it is essential to follow the preparation process step by step to ensure that the perfect base is created for skiing.
The removal of wallpaper is a laborious task, but it is necessary for the preparation of walls.
When the plaster is ready, move your trowel over it to remove any lines left by the trowel and scrape off any excess plaster as you go.
During this phase, give your trowel more pressure than usual, but be careful not to press it too hard, or you will damage the plaster.
If there are any gaps, more plaster should be added to fill them in and create a reasonably smooth base for the subsequent coat of plaster.
This is undoubtedly one of the most detested jobs in the history of mankind, yet it is absolutely necessary to get the walls ready.
When plastering over a wall with plaster on it or a surface with poor suction, it is vital to use PVA and scrim tape any cracks.
Additionally, when plastering over a wall that already has plaster on it, it is essential to wipe the walls down before plastering.
Plastering directly onto bare plasterboard requires the application of PVA, and it is essential to use scrim tape in the spaces between the joints of plasterboards if any movement causes the crack to widen.
A solution of PVA and water with a ratio of 3:1 directly to the wall can be done by painting it.
This will seal the wall and form a 'key,' improving the suction and allowing the plaster to adhere more effectively.
Primers that resemble grit can also be purchased separately, and these variants of the product offer improved functionality and come in various hues.
Because PVA decreases the suction rate, plastering is made more accessible, and the plaster has a better chance of adhering to the walls.
It is essential to follow the directions provided by the manufacturer and combine the PVA with water in a ratio of three to one.
The instructions for plastering are the most vital information contained in this article.
The first thing you need to do is roll PVA mixed with three parts water over the walls.
The second thing you need to do is ensure the first layer is dry before applying the second layer.
In the third stage, you will begin skimming the walls once you notice they have become slightly sticky.
Mixing the plaster is the fourth and last phase in this process.
It is recommended that you begin by adding one-third of a bag of plaster, then mix the plaster using the mixer, after which you should add the remaining two-thirds of the bag and complete mixing.
Always mix in a clean bucket, and ensure your water is always clean.
The plaster ought to have the consistency of melting ice cream and remain on the bucket trowel without falling off when the level is held.
Plaster of Venice is a material well-known for its employment in the city of Venice, which is located in Italy.
Granulated limestone and water are the primary components in its production; in many cases, dyes are also added to achieve the desired colour.
It may be purchased in stores and on the internet under various names, and its purpose is to imitate the look of rarer and more expensive building materials without compromising a wall's overall quality or beauty.
Researching how it is created, what your alternatives are, and other helpful hints from professionals can help you better incorporate it into the design or decor of your home.
The process of heating up limestone and combining it with water to make Venetian plaster is similar to that of making stucco. It may appear more or less like marble by using a variety of paints, finishes, and compositions, and it has an appearance comparable to that of marble.
Because of its permeable composition, it is resistant to mould and mildew, and it is environmentally beneficial because it is made from natural resources.
Fans of the do-it-yourself movement can apply a Venetian plaster finish independently if they have the necessary tools and patience.
Meode, a company specialising in paint and plaster, provides a list of the instruments and supplies required for do-it-yourself projects.
Content Summary
- Make sure your wall is clean before you begin by removing particles of previous plaster, dust, or wallpaper as you go. Additionally, check your wall's suction to ensure it is not too porous.
- Therefore, you should manage the suction of your wall using water or PVA. This should satisfy the thirst of the wall, preventing it from taking moisture from your plaster excessively quickly.
- When the water runs down the wall, you will know the suction has been successfully regulated.
- Backgrounds with a low suction, such as painted surfaces, must also be adequately prepared. This can be done, for example, by applying a mixture of PVA glue and water to the wall to ensure that the plaster adheres to the wall.
- After that, you can begin the process of plastering the wall.
- When you are finished mixing the plaster, it should have the consistency of thick cream, and there should be no lumps.
- After that, you can slowly mix your plaster using a unique paddle or mixing stick, but you should always have another bucket of water handy if you need to clean your instruments.
- Putting up plaster on your walls.
- First, to properly plaster a wall or ceiling, you will need access to various specialised plastering tools and equipment.
- You will need the appropriate tools before you begin the plastering process.
- You'll need these five primary tools to get started with the skimming process.
- These are the most fundamental instruments that you will require.
- You absolutely must go out and purchase a high-quality plaster mixer.
- Water brush Plastering requires a variety of instruments, one of the most important of which is a high-quality water brush.
- In addition to that, you are going to require a brush to clean all of your gear.
- Plastering is one of those jobs where keeping your tools clean is one of the most vital tasks.
- If you treat your instruments with respect, they will treat you with respect in return.
- Plastering your walls is the second step, so ensure they are ready. Now that you have the instruments, you must educate yourself on properly preparing the area.
- Scrub the surfaces of the walls. Washing down your walls is something that isn't always required, but it is something that I recommend doing.
- Plastering a ceiling was a task that was not overly complicated to complete.
- Everything, with the exception of the fact that I did not clean the ceiling thoroughly before I began.
- To prevent something similar from occurring in your home, I recommend washing the walls with sugar soap, combining it with water, and then applying it to the region that will be the focus of your renovation.
- This permits the natural movement that occurs in your home and keeps the plaster from cracking as a result of it.
- You should use scrim tape on any cracks in your walls.
- PVA How should a wall be PVA'd before it is plastered?
- Plastering directly onto raw plasterboard eliminates the need to use PVA as a binder.
- A solution of PVA and water with a ratio of 3:1 directly to the wall can be done by painting it.
- The solution will aid in sealing the wall and form a "key," which will improve the suction, allowing your plaster to stick to the wall more effectively.
- The application of PVA to your walls is considered to be standard practice.
- PVA helps ease the process of plastering by reducing the rate of suction.
- PVA allows the plaster to adhere to the walls, another advantage of using it.
- On the other hand, you should combine one part PVA with three parts water, give the mixture a good mix, and then simply roll it all over your walls.
- Always make sure you check the expiration date on the plaster.
- If you follow these easy instructions, you will end up with an excellent mixture for plastering.
- The following steps accomplish plastering: The first layer of plaster The second layer of plaster Flatten your plaster 1st trowel positioned on top of 2nd trowel The finishing touches The Complete Instruction Manual For Venetian Plaster Plaster from Venice is a type of plaster that is famous for its use in the construction of buildings in Venice, Italy, which is a city recognised for its Gothic and Renaissance-inspired architecture (via Architecture of Cities).
- Plaster is used extensively in contemporary architecture and interior design because of its adaptability, which makes it quite frequent.
- If you are interested in installing this plaster or using it in the future, research how it is manufactured, what your alternatives are, and other professional recommendations that will help you better fit it into the design or decor of your home.
- How is Venetian plaster made?
- By gaining a grasp of the production process for Venetian plaster, one can gain a greater understanding of the plaster's composition, quality, and aesthetic look.
- Historical artisans traditionally made the putty used in Venetian plaster by heating up limestone and then combining it with water.
- The advantages of using Venetian plaster The aesthetic appeal of Venetian plaster is the critical factor contributing to its popularity among interior designers and architects.
- Due to the fact that it has a permeable composition, it is naturally resistant to mould and mildew, even if it has not been treated or finished in any specific way.
- Plaster from Venice that is made with lime and other natural ingredients is considered to be environmentally friendly.
- What you need to know to get started with a Venetian plaster job that you are doing yourself DIY fanatics will be overjoyed to learn that the Venetian plaster finish may be installed on one's own without the assistance of a professional.
- Meoded, a company that specialises in paint and plaster, provides a list of the tools and materials required to complete the plasterwork on your own.
- One of the most essential pieces of advice they have given is to wear protective gear, also called personal protective equipment (PPE).
- If you don't already have a pair of work gloves or safety goggles at home, you should consider investing in a pair of each.
- In order to apply the plaster, you will also need a trowel or spatula made of stainless steel, many paintbrushes or rollers for brushing paint and finishes, and a set of paint trays to hold the necessary substances.
- Plasterwork requires a primer, the plaster or stucco mixture, natural or synthetic colourants, and a wax finish. If you want to do a complete job, you will need all of these materials.
- Bear in mind that to complete this project, numerous layers of plaster, paint, and sealants will need to be applied, and you will need to wait for each layer to cure before moving on to the next step.
- The procedures involved in the Venetian plaster application: You have to ensure you have a clean working area set up before you can start the real application procedure.
- Placing tarps and tape over your floors, walls, and close furniture will protect them from plaster and paint splatters. This will also keep your belongings from becoming damaged.
- You should, however, transfer the furniture and decorations in the room where your project is taking place to another room if you can or have assistance available.
- During the procedure, ensure that all of the room's doors, windows, and vents are open, and set up fans to assist with ventilation.
- You must know that if you plan on remodelling your walls, the experts at Vasari Lime Plaster and Paint recommend that you patch any holes or fractures in the surface of your plaster project.
- Following the primer's application, the plaster's first layer is smoothed using a trowel or a spatula.
FAQs About Plaster
When mixing plaster, you should always start by adding the plaster to the water rather than the other way around. 14.
First, add just enough plaster to make a mound on top of the water and mix it so there are no lumps.
Then, carefully add more plaster using a wooden stick or mixer drill until it has the desired consistency.
Plastering is a skill that anyone may acquire.
It is a skill, and everyone wanting to learn may be taught any skill they wish to master. Plastering is a skill that virtually anyone can learn.
There are instances when having no experience is preferable because you do not have any harmful habits to correct.
7 Steps to Plastering
- Put on the first layer of plaster.
- Make a new batch of plaster, then add a second coat.
- Remove any ripples from your wall by going over it with a trowel.
- Your wall will become flatter and have a smoother finish after you wait ten minutes.
- Please wait ten minutes before beginning your first trowel.
- Make it look like a wet trowel by using your water brush.
- The final trowel will bring your wall to completion.
Plastering is labour that can be strenuous on the body, so it is essential to maintain a certain level of physical condition.
Plaster is required in many different phases of construction, ranging from residential to commercial buildings, and as a result, this occupation offers a great deal of flexibility.
You will never be bored because there will always be a new site to work on.
It can irritate the respiratory system, which may, in some people, result in occupational asthma.
The long-term implications on one's health of routinely breathing plaster dust when mixing are unknown.
Still, they are likely to include chronic obstructive pulmonary disease (see below for a further explanation).