
If you have a plaster ceiling with a large hole, you may wonder how to repair it. While this may seem daunting, it is possible to fix it yourself with the right tools and techniques.
In this article, we will guide you through the steps of repairing large holes in plaster ceilings, including what materials you will need and how to prepare the area.
We will also provide tips for avoiding common mistakes and ensuring a smooth, seamless finish. So whether you are a DIY enthusiast or just want to save money on hiring a professional, read on to learn how to repair large holes in your plaster ceiling.
How To Repair A Plaster Ceiling
It is important to determine the structure of your plaster ceiling before beginning any repairs. Additionally, it is important to determine the cause of any cracks in the ceiling. If the problem is due to moisture, then you will need to be familiar with the procedures for repairing ceilings that have been damaged by water.
Traditional ceilings made of lath and plaster have been mostly phased out in favour of more modern alternatives such as drywall or plasterboard, which are then skimmed with a very thin plaster coating to produce the same flawless finish. The sort of plaster ceiling that you have in your home will determine the procedures that may be used for repairs.
Whether the damage was caused by repairing a ceiling leak, doing sloppy DIY work, ordinary wear and tear, or something a bit more serious, we have compiled an easy guide to help you identify the warning signs and know how to restore a plaster ceiling in a manner that is appropriate.
Track Down The Cause Of The Problem
You will need to figure out what initially caused the damage to your ceiling to get started on any kind of repair work on it.
Sometimes it is evident; unattractive yellow stains are a clear symptom of a moisture problem, therefore, you would be best served by studying how to restore a ceiling with water damage as an example. In other cases, though, it may not be so obvious. On other occasions, however, it may be somewhat more difficult.
It is quite likely that the crack in the plaster ceiling was caused by anything purely aesthetic, such as fluctuations in temperature or work done on the ceiling by the homeowner themselves, for example. On the other hand, it is preferable to do research.
Cracks less than one-tenth of an inch wide are often nothing to worry about; however, cracks over one-tenth of an inch wide can be a warning indication that there may be structural difficulties on the horizon.
In the event that the crack in question runs the length of the wall as well as the ceiling, you will need to investigate the reasons behind the wall cracks in order to find a solution to the problem.
You won't be able to think about how to repair a plaster ceiling until you've determined what caused the problem and fixed any problems that arose as a result of your investigation.
Protect The Area
When working with old plaster in particular, it is imperative that you wear protective gear such as a face mask and goggles at all times, regardless of how extensive the necessary repairs may be.
Plastic should be used to protect the walls and furnishings, and drop cloths should be laid down to make cleanup of any dust or scrapes after the fact much simpler.
How To Repair Cracks And Holes In A Plaster Ceiling
Repairing cosmetic difficulties, such as nail holes and gouges produced by DIY work, and patching ceiling cracks that are fine in a plaster ceiling, are examples of issues that are reasonably simple to address.
In spite of the fact that it can appear paradoxical, the greatest thing you can do is make the crack a little bit bigger.
This will ensure that you get enough easy sand into the crack for a substantial strong fill."
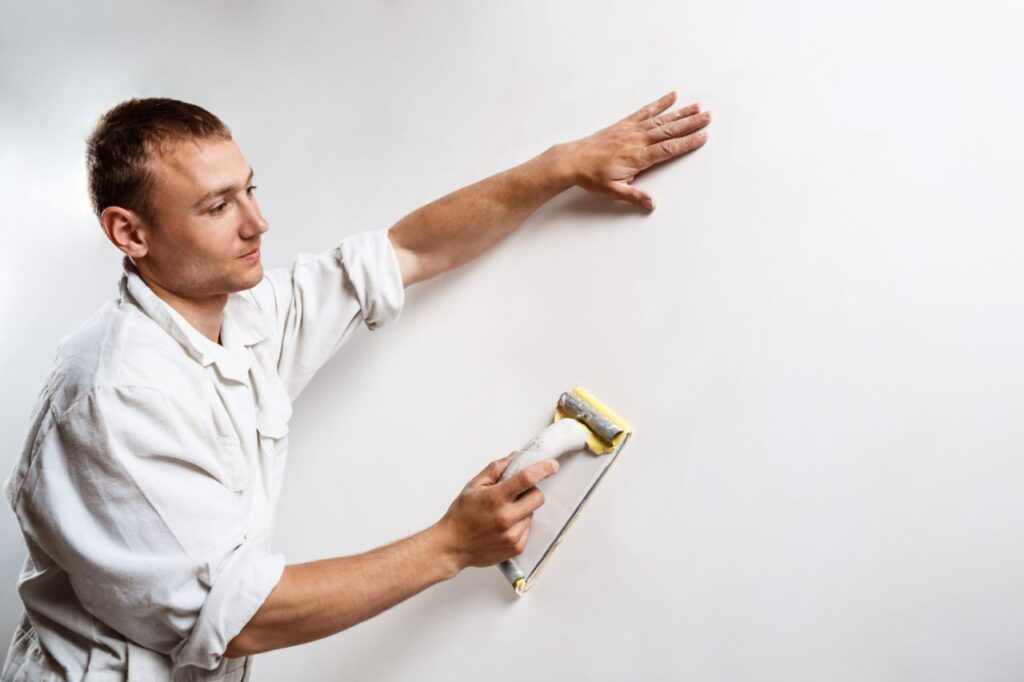
Before applying joint compound or filler with a putty knife and scraping off the excess as you go, make sure that any debris has been removed from the area using a brush.
After applying a few very thin coats, you should wait for it to dry and then sand the area to get a finish that is even and smooth. The next step is to prime and paint it so that it matches the wall.
Before placing the joint compound on top of the crack and smoothing it out, you might want to try covering bigger cracks with mesh or fibreglass tape first. This approach is also applicable to less significant holes.
Prepare a Drywall Patch
Use a piece of drywall the same thickness as the wallboard. Cut a square piece a bit larger than the damaged area and hold it over the hole to trace the outline onto the wall.
Cut Out the Square Hole
After positioning the fresh sheet of drywall on top of the newly framed area, secure it with screws. It is recommended to use at least four screws, one in each corner, and to bury the heads of the screws below the surface of the drywall patch.
Make cuts with a drywall saw starting within the hole and going all the way out to the four corners of the square. At each corner, cut a little bit beyond the pencil point to ensure that the new drywall patch will simply fit without requiring any force.
Utilising a utility knife of sufficient sharpness, score the pencil lines that surround the hole. To ensure that the squared hole is still sufficiently large for the new patch to fit readily, cut just a little bit outside the lines.
Remove the damaged wallboard's sides by snapping them off and then pressing it into the hole while following the score lines. Remove any broken pieces that are located along each side of the squared hole by cutting through to the backing paper and removing them.
Install the Wood Frame
After positioning the fresh sheet of drywall on top of the newly framed area, secure it with screws. It is recommended to use at least four screws, one in each corner, and to bury the heads of the screws below the surface of the drywall patch.
Keep the new drywall patch in place while you check that it can easily go into the newly created hole without having to be pushed or pulled. Remove any impediments that inhibit a good fit by doing any necessary trimming around the hole's perimeter, if necessary.
Take a measurement of the opening of the squared hole, and then cut two strips of furring material that are 6 inches longer than this length.
Place each board up against the squared hole, and using a pencil, make a mark on the board to show where the hole's edge is. Create the mark in such a way that it can be seen when the board is placed against the wall on the interior of the building.
Place each furring strip in the hole, making sure to position it so that the wall that runs down the side of the square partially covers it. Attach the wood strip to the wall by using the indications for placing at the top and bottom to guide you as you drive drywall screws through the wallboard and into the wood behind it using a drill-driver.
While you are driving the screws into the wallboard, make sure that the wood is pressed firmly against the inside of the wallboard. This will prevent a gap from forming between the strip and the wall. In order to prevent the screw heads from sticking out and interfering with the patching compound, you should sink them slightly below the wall's surface.
Install the Drywall Patch
After positioning the fresh sheet of drywall on top of the newly framed area, secure it with screws. It is recommended to use at least four screws, one in each corner, and to bury the heads of the screws below the surface of the drywall patch.
Fibreglass mesh tape should be applied over the seams surrounding the new patch. When you get to the corners, overlap the ends of each piece of tape.
Apply a First Coat of Joint Compound
The first two coatings of this repair are going to be done using a joint compound that has a setting time of 30 minutes. The third and final layer is made with the ready-mixed compound so that the final sanding can be completed more quickly and the finish can be made more even.
Follow these steps to prepare a pan of setting compound, which is often referred to as mud, and then apply the first layer with a joint knife that is 6 inches long. The surface should be "butter" with a thick coat that completely covers the tape as well as the wall surface around it.
Immediately return to the area and scrape off the excess mud to leave behind a semi-rough coat. Repeat the process a number of times to get rid of the majority of the muck. Do not attempt to conceal the tape or even out the surface of the wall with this first application; it will take a few additional applications to build up a surface that is smooth and level.
Simply apply this coat over the tape to ensure that it stays in place and to begin blending the new patch in with the rest of the wall.
Apply a Second Coat of Compound
Wait for the mud to harden to the point where it is dry to the touch, and then sand the tape lightly using sandpaper that has a medium grain. When using sandpaper, be careful not to dig into the fibreglass; instead, use light pressure to remove any mesh fibres and ridges in the mud. Use a moist rag to remove the sanding dust from the surface gently.
Prepare a second layer of the setting compound by mixing it and applying it. This time, you should apply a thick layer all over the patch with a bigger joint knife, and you should spread it out such that it overlaps the previous coat.
Using strokes that are parallel to one another and moving from one side to the other, go back over it as soon as possible to remove the excess. You should work towards bringing the mud up to the same level as the surrounding wall as much as possible, but you shouldn't let it extend beyond the wall's surface.

Ignore any ridges that are left between strokes by the edge of the blade; you may knock them off before applying the next coat. Give the muck some time to dry completely before proceeding.
Apply a Third Coat of Compound
Shave off any ridges in the mud by using an upward stroke with the joint knife to scrape off any ridges that may have formed. Sand the surface if necessary to smooth off any extra roughness, and then wipe away any dust that you create.
Joint compound that has already been prepared should be used to apply a third layer of mud over the whole area. Applying a heavy coat initially, then skimming off the excess to smooth the surface, is the same procedure you should do.
Stroke in the opposite direction of the previous coat to assist you in achieving a surface that is more even. If you have previously skimmed the muck in a horizontal motion, try doing it in a vertical motion this time.
Sand and Touch Up the Paint
Do not attempt to sand these imperfections out, since this will cause the surface to become uneven. Instead, when the mud has dried, apply a second layer, if required, to cover any scratches or pits in the surface.
In the event that a second coat is required, perform a light sanding, remove any dust that may have accumulated, and apply the mud in a direction that is perpendicular to the first layer.
Sand the entire surface after you have certain that the final layer of mud has completely dried. Sand the patch with sandpaper of medium grit and feather the edges so that they blend in with the surrounding surface.
Dust from the sanding should be removed with a moist towel, and then the repair should be touched up with paint. If you use paint with a flat latex finish, the paint will prime itself automatically. Before touching up the area, you should first prime it with flat latex paint or a latex primer if you will be using a glossy finish paint such as semi-gloss or another shiny finish.
How To Repair A Sagging Plaster Ceiling
Traditional lath-and-plaster ceilings are constructed by attaching strips of wood or metal mesh (referred to as laths) to the ceiling joists to provide a solid base and then adding layers of plaster on top of that. This type of ceiling is most commonly found in older homes.
Plaster has a natural tendency to dry out, which causes it to become less cohesive and lose its ability to maintain its hold on the laths. The plaster will start to sag or bulge as the first indication of this problem.
For a task of this nature, we recommend getting the assistance of a professional; but, if you insist on doing it on your own, the following is how the do-it-yourself specialists recommend you proceed:
- "To prop up the sagging plaster, use a flat piece of chipboard or plywood that has been nailed to a length of 38mm-square timber," the instructions read. This ought should stretch all the way up to the top of the ceiling. To gather up any loose plaster, you will need to lift the floorboards in the room above and vacuum between the joists over the bulge.
- "Mix up some fairly runny boding undercoat plaster, and then pour it over the broken plaster to replace it," the instructions say to do. Maintain the position of the supporting prop until the plaster has cured and formed a connection with the laths.
After that, you have the option of removing the old plaster or keeping it in place and resurfacing the entire area with new drywall.
Does Water Damaged Plaster Need Replacing?
It depends. In the event that current plastering treatments have been applied, you will need to determine whether or not the drywall that is located below has sustained significant water damage. Mould and discolouration in the ceiling, as well as the presence of huge holes or drooping in the ceiling, are indicators.
In this particular scenario, the ceiling would need to be redone entirely, including all of the structural components, like the beams.
However, repairs aren't typically as extensive as they sound. If the damage caused by the water is only on the surface and the laths have not been compromised, you may simply replaster over the existing layer.
Can You Repair Part Of The Ceiling?
If only a tiny section of your ceiling is damaged, you should be able to execute a straightforward repair using a patch made of plasterboard or drywall. After removing the damaged section of plaster, fix the hole with drywall and secure it using drywall screws.
It is recommended that you remove any old plaster from the surface of the wall before purchasing plasterboard to use as a repair patch. According to the do-it-yourself gurus at B&Q, "then you can choose the thickness that is closest to the depth of your plaster."
Can I Fix My Own Ceiling?
It is dependent on the level of damage that has to be repaired as well as the type of finish that you want. However, larger repairs, such as patching large cracks or repairing water damage, should be handled by professionals to guarantee that the ceiling is repaired to the appropriate level of safety standards.
It is essential to handle any problems with repairs as quickly as you can, regardless of whether you choose to do the work yourself or consult a professional. When they go untreated for an excessive amount of time, it might lead to more expensive problems in the future.
Patching Small and Medium Holes
Put on safety goggles and a dust mask.
Because you will be working underneath the hole, it is essential that you protect your eyes and mouth from falling debris and dust from the drywall. Safety goggles are superior to safety glasses due to the fact that they completely enclose the wearer's eyes and do not allow anything to enter.
If you breathe in drywall dust, it might irritate your lungs and create other respiratory issues; thus, you should always use a dust mask when cutting or fixing drywall.
In order for you to reach the ceiling, you will need to make sure that you are working with a stable step ladder.
Use a utility knife to cut away any loose debris around the edges of the hole.
To make the hole look more tidy and get rid of any rough edges, carefully slice away any stray bits of drywall and paper that are located around the perimeter of the hole.
You should make an effort to clean the hole up sufficiently so that a patch of drywall repair may be applied so that it sits flat against the ceiling.
This approach is suitable for patching holes in drywall ceilings that have a maximum diameter of 6 inches (15 cm).
Cut a drywall patch so it is 1 in (2.5 cm) bigger than the hole.
Using scissors that are sharp, cut a square piece of drywall repair material so that it is 1 inch (2.5 cm) higher and 1 inch (2.5 cm) broader than the hole that has to be patched.
Because of this, it will have an additional length and breadth of 0.5 inches (1.3 centimetres) on each side, allowing it to attach to the ceiling surrounding the hole.
Drywall repair patches are often comprised of a type of mesh that has a very tight weave. They are available in squares of varying sizes, with the largest measuring approximately 8 inches (20 cm) in diameter.
A drywall repair patch is available for purchase from home improvement centres, hardware stores, and even on the internet.
Remove the backing from the patch and place the patch over the hole.
Remove the protective covering from the adhesive side of the drywall patch, then apply the patch to the damaged area. After positioning the patch to be centred over the hole, firmly push it against the ceiling on all sides to ensure that it will adhere.
Because the adhesive will cure instantly, you can immediately begin covering the patch with a spackle without waiting for it to dry.
In order to complete the repair of the hole, you will now need to spackle and sand the patch.
Patching Large Holes
Protect your eyes and mouth with safety goggles and a dust mask.
Because of this, you won't have to worry about getting drywall dust or debris from the hole in your mouth or eyes. When repairing holes in drywall or cutting drywall, it is imperative that you always wear this kind of protective gear.
It is strongly recommended that you wear goggles designed specifically for safety purposes, as opposed to safety glasses with open sides. Because you will be working directly under a hole, where dirt and debris will be falling in a vertical direction, you should wear as much protection as possible.
In addition to it, you'll need a stable step ladder that you can stand on in order to go to the ceiling.
Cut a drywall square that is 2 in (5.1 cm) bigger than the hole.
A fresh piece of drywall will need to have a square patch cut out of it. You can do this using a utility knife or a drywall saw. Make it 2 in (5.1 cm) wider and 2 in (5.1 cm) taller than the hole in the ceiling so you can cut the hole square to fit the patch.
Small pieces of drywall measuring about 2 feet (0.61 metres) by 2 feet (0.61 metres) can be purchased specifically for the purpose of making patches. In the event that you do not have any spare drywall laying around, you may purchase a piece at a home improvement centre and cut the patch from it.
This approach is suitable for use with holes having a diameter of more than 15 centimetres (6 inches).
Trace the outline of the patch onto the ceiling around the hole.
Place the square patch in the centre of the opening, and press it firmly against the ceiling. To cut a square hole in the ceiling, first, create the outline of the patch on the ceiling using a pencil by tracing around the borders of the patch.
If the hole is too large and uncomfortable for you to fix on yourself alone, enlist the assistance of a friend to help you hold the patch against the ceiling while you trace it.
Use a drywall saw to cut the square outline around the hole out.
Cut from the centre of the hole diagonally out towards each corner of the outline you traced. Put the point of the saw into one of the corners, and then saw down the line that is to the side of the outline.
When you get to the other corner, remove the portion of jagged drywall that you just cut away. Continue doing so down each side of the outline until you have completely removed it from the paper.
At this point, you may try applying the patch to the hole to ensure that it will go on without any problems. In the event that any modifications are necessary, you can use a utility knife to make cuts along the hole's perimeter in order to remove minute quantities of material.
Cut 2 furring board strips 6 in (15 cm) longer than the width of the hole.
Pieces of softwood timber measuring 1 in (2.5 cm) in thickness and 2 in (5.1 cm) in width, furring boards are used for a variety of carpentry applications.
To secure the patch and keep it in place, cut two pieces of furring board that are longer by six inches (or fifteen centimetres) than the width of the square hole. These strips will be connected within the hole.
A home improvement centre or a lumber supply shop are two places you may go to get furring strip board. In most cases, they are sold in lengths of 8 feet (2.4 metres), however, it is possible to locate smaller waste pieces.
To cut the strips, you can utilise either a hand saw or any sort of power saw that you have at your disposal. It is not as important that the cuts be made absolutely straight because they will be covered up by the ceiling once it is installed.
Attach the furring board strips inside the hole using drywall screws.
Insert the strips at each side of the opening so that the ceiling overlaps about a quarter of the furring boards at the sides and that the furring boards have a length of 3 inches (7.6 cm) against the interior of the ceiling at each end.
In order to put a drywall screw through the ceiling and the overlapping furring board at either end, you will need to use an electric drill.
It is important to ensure that the furring board strips are held securely in place while the screws are being driven through the ceiling and into them. This will ensure that there are no spaces left between the ceiling and the wood.
If the strips of furring board that are attached to the interior of the ceiling are not flat against one another, the patch won't sit flush with the ceiling.
Screw the drywall patch to the furring board strips.
After inserting the square drywall patch into the hole, firmly press it against the furring board strips to keep it in place. Every three to four inches (7.6 to 10.2 cm), or thereabouts, drive a drywall screw through the patch and into the boards.
If you are unable to do it alone because it is too difficult, you should ask another person to securely hold the patch in place while you put the screws in.
It is important to note that in order to complete the task, you will need to sand and apply spackle to the patch.
Conclusion
It is important to determine the structure and cause of any cracks in the ceiling before beginning any repairs. Track down the cause of the problem to get started on any kind of repair work.
Research the cause of the crack in the plaster ceiling and wear protective gear to protect the area. Repair cosmetic difficulties such as nail holes and gouges by making the crack bigger and applying joint compound or filler. Prime and paint the area to match the wall.
Cover bigger cracks with mesh or fibreglass tape, cut out the square hole, score pencil lines, remove damaged wallboard, install the wood frame, check the fit, remove any impediments, and cut furring material 6 inches longer than the opening.
Mark the hole's edge, place furring strips in the hole, drive drywall screws through the wallboard, install a drywall patch, apply fibreglass mesh tape, apply a first coat of joint compound, and sand the surface.
Apply a semi-rough coat of setting compound over the tape to ensure it stays in place and blend the new patch in with the rest of the wall. Apply a second layer of setting compound with a joint knife to bring the mud up to the same level as the surrounding wall. Apply a third layer of setting compound to smooth the surface.
Stroke in the opposite direction of the previous coat to achieve a more even surface. Sand and touch up the paint to cover any scratches or pits, then prime the area with flat latex paint or a latex primer.
Prop up sagging plaster with chipboard or plywood, pour boding undercoat plaster over it, and resurface the area with new drywall. If water damage is present, replaster over the existing layer, or repair part of the ceiling with a patch. Remove old plaster before purchasing plasterboard to use as a repair patch.
Consult a professional for larger repairs. Put on safety goggles and a dust mask. Use a utility knife to clean the hole up. Cut a drywall patch 1 in (2.5 cm) bigger than the hole and apply it to the damaged area. Protect your eyes and mouth with safety goggles and a dust mask, and use a stable step ladder to reach the ceiling.
Cut a drywall square 2 in (5.1 cm) bigger than the hole in the ceiling using a utility knife or a drywall saw. Trace the outline of the patch onto the ceiling and use a drywall saw to cut it out. Apply the patch to the hole and make any necessary modifications.
Cut two furring board strips 6 in (15 cm) longer than the width of the hole to secure the patch and keep it in place. Use an electric drill to drive a drywall screw through the ceiling and furring board strips, pressing the patch against them.
Content Summary
- If you have a plaster ceiling with a large hole, you may wonder how to repair it.
- In this article, we will guide you through the steps of repairing large holes in plaster ceilings, including what materials you will need and how to prepare the area.
- Additionally, it is important to determine the cause of any cracks in the ceiling.
- In the event that the crack in question runs the length of the wall as well as the ceiling, you will need to investigate the reasons behind the wall cracks in order to find a solution to the problem.
- Before placing the joint compound on top of the crack and smoothing it out, you might want to try covering bigger cracks with mesh or fibreglass tape first.
- After positioning the fresh sheet of drywall on top of the newly framed area, secure it with screws.
- Simply apply this coat over the tape to ensure that it stays in place and to begin blending the new patch in with the rest of the wall.
- Prepare a second layer of the setting compound by mixing it and applying it.
- If you have previously skimmed the muck in a horizontal motion, try doing it in a vertical motion this time.
- This ought should stretch all the way up to the top of the ceiling.
- In the event that current plastering treatments have been applied, you will need to determine whether or not the drywall that is located below has sustained significant water damage.
- If only a tiny section of your ceiling is damaged, you should be able to execute a straightforward repair using a patch made of plasterboard or drywall.
- It is recommended that you remove any old plaster from the surface of the wall before purchasing plasterboard to use as a repair patch.
- Use a utility knife to cut away any loose debris around the edges of the hole.
- Cut a drywall patch so it is 1 in (2.5 cm) bigger than the hole.
- Remove the backing from the patch and place the patch over the hole.
- Patching Large Holes Protect your eyes and mouth with safety goggles and a dust mask.
- Cut a drywall square that is 2 in (5.1 cm) bigger than the hole.
- Use a drywall saw to cut the square outline around the hole out.
- Cut 2 furring board strips 6 in (15 cm) longer than the width of the hole.
- Attach the furring board strips inside the hole using drywall screws.
- Screw the drywall patch to the furring board strips.
FAQs About Plaster Ceilings
However, a plaster filler like Polyfilla or a powder filler are probably the best options for filling plaster cracks, as alternatives such as caulk are best used for other purposes, like sealing gaps around pipes or tiles.
2-5 mm gaps can be dealt with simply by applying scrim tape, then once you've mixed your plaster up - before you start applying the 1st coat work some plaster through the scrim tape and into the gap behind - this will ensure the extra thickness has a bit longer to firm up and will not sag when on the finishing stages.
There are two types of filler for walls and ceilings. These are either ready mixed or fillers you have to mix with water. I usually stay away from ready mixed fillers unless they are a fine surface filler or such like. For large areas of surface filling I use a drywall type filler.
Powder filler is often for deeper cracks or holes. It's usually cheaper than other fillers, and you mix it yourself. Because of the depths it can fill, it's versatile and can often be used indoors or outdoors. Ready-mixed fillers can be used on a variety of different jobs and are often really easy to apply.
Joint compound is the best choice for larger cracks, and it should be used with materials to reinforce the joint, like mesh drywall tape. For small cracks, flexible patching compound is a good choice, because it will continue to move and flex with the other building materials.